|
When I say "take out the tower", I am referring to wars in a playground
setting, with 'jungle-gym' style terrain/cover. Often in this scenario, one or two people on the opposing team will
hole up in the tower at the top of the spiral slide (which actually provides excellent cover and an even better vantage point.)
However, there is a weakness. This is not necessarily true on newer playgrounds, but for many, the tower's canopy has an
opening for entering, and an opening to exit down the slide. The older ones don't have slits in the side through which parents
can continue to watch their children from the ground. The new ones have these slits, but they are a fairly recent development,
so you are very likely to be able to use this. This tactic allows you to take out one or two enemies in the tower.
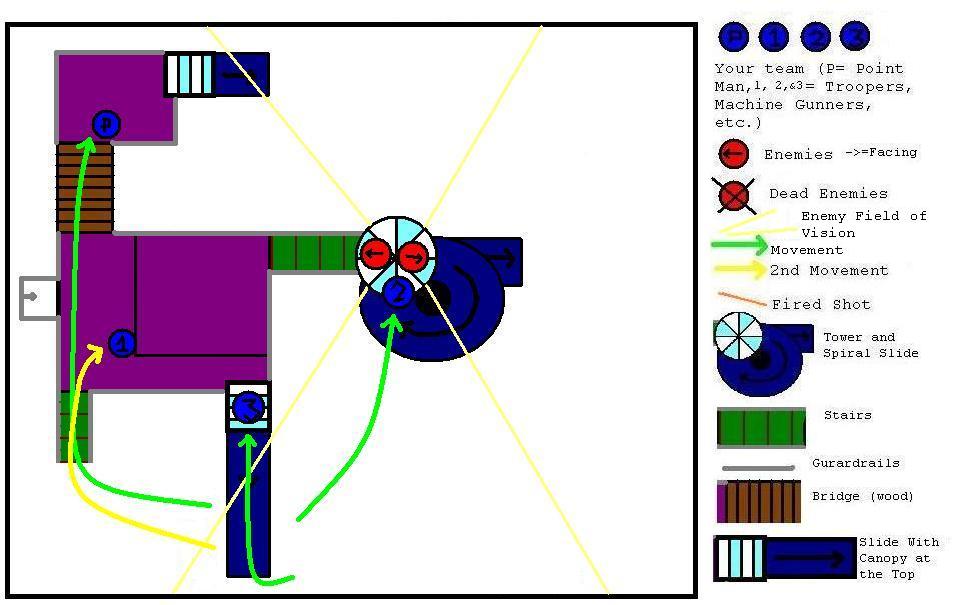
The diagrams show four people on your team, but that is not essential; it is just the most desired number, as three people
on your side can occupy two on the other to distract from the fourth a lot more easily than two. The diagrams also show
two enemies, which is the max. number of people that can be crammed into a tower with room for firing. If there is only
one in the tower, this will work even mroe easily. The key on each diagram explains most of it, but jsut so you know,
the large purple shapes are the main floor section of the jungle-gym (the smaller square inside the large one is just higher
than the other.) Also, on the later diagrams (2-5) the yellow lines indicating their field of view are hindered by the
two sides of the tower; this is what makes the tactic work. Start out as follows (your playground won't look like mine;
it's ok. Just so you get the idea..)

Yes, I know the colors are horrible. These aren't the colors
on my playground. I chose them so that they would all be different so that the movements and general concept of the
whole tactic would be easy to under stand. Anyway, here you see two enemies in the tower, facing opposite directions
out the two openings. Your team is down below on the ground. In the next diagram you will see roughly how much
the enemies can see from their vantage point.

Now, we see the first movement in the sequence. Also, the shaded
areas indicate the blind spots of the enemy (the other diagrams will continue to have the border lines of the blind sopts,
but will not have the shading for clarity.) Note that Blue P and Blue #1 have both moved into the view of the enemy
on the left (Blue #1 moving just slightly after Blue P to give P room.) However, Blue P is the only one of the to that
is completely succeptible to fire. Blue #1 is behind the slide, so he is partially protected. Blue #2 and Blue
#3, however, move up into positions in the blind spots of the enemy. No one fires yet. You MUST NOT stop moving
at this position. You must immediately continue through to the next digram, or Blue P will be fire upon, and probably
killed.
ON this diagram, wee see Blue P at his final destination. Two
diagrams ago to his present position, he did not stop moving. It is all continuous to here. WE also see Blue #1
in his final position. He has move to a slightly less succeptible to enemy fire position that Blue P was in last diagram.
This may not seem true, at first, but you will realize upon closer examination thatif he lays down on the main deck of the
playground equipment, he will be partially covered by the step that is inbetween him and the enemy, as well as partially covered
by the vertical bars in the grey fencing around the edge of the jungle-gym between him and the enemy. Bluye #2 has now
run up the slide (this should be done with shoes having VERY large amounts of affective traction. In other words, he's
gotta have shoes with grip. If he is running up the slide and begins to slide back down before he gets up to the top,
he will get capped in the pause. If he isn's immediately capped, either your enemy sucks, or he will get capped
when he stands up straight and flails his arms to keep his balance. He MUST get all the way up the slide, and should
then crouch down inside the domed top of the slide. This is his cover, and it should be adequate.
Note finally, that Blue #3 is now underneath a part of the spiral slide, and is completely out of the sight of the
enemies. Your opponents should not yet know that there are four enemies here. They should have only discovered
Blue #2 when he charged up the slide, so they should be thinking that there are only three. Keep it that way.
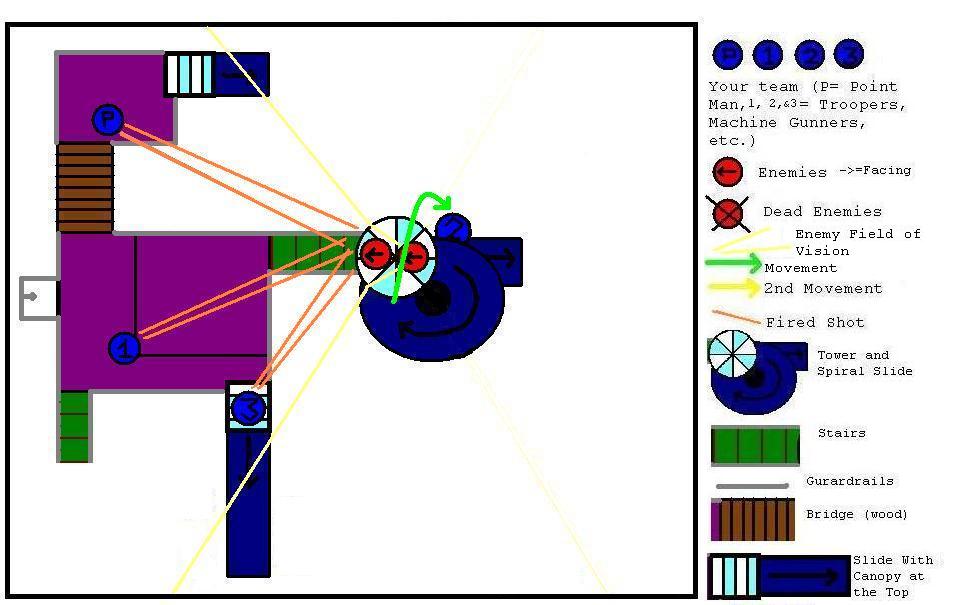
Now sequence really begins to pick up the pace. Blue P, Blue
#1, and Blue #2 all open fire on the opening on the left. It is cover fire. You can try to hit the enemy all you
want, and if you do, all the better, but this is usually a decent range to fire accurately from, so don't get all choked
up if you don't hit the enemy. The whole point is to REALLY get their attention. Notice, that the enemy on the
right is facing the same way as the other. Now he is completely blind to the opening he used to be facing out, and the
outlines of the enemy's field of view are changed accordingly. This was the fatal mistake, and they make it every time.
The one enemy wants to help his teammate with all the opponents on his side, so he turns around, leaving himself blind to
his doom. This doom is Blue #3 (remember him?) who now (after about eight seconds of covering fire from his temmates,
as he cannot see when the enemy has turned all the way around) comes around and gets onto the bottom of ths piral slide (QUIETLY!!!)
and puts his hands on the top of the section of spiral slide aboove him.

Blue P, Blue #1, and Blue #2 are still laying down covering fire to
distract the enemies up to and through their moment of death. Blue #3 opens up on the enemy on the right's back with
a powerclip, Blastfire, Wildfire, Rapid fire 20, Hornet, etc. After two shots (no more than four or so) on the
enemy on the right, he should point his barrel at the enemy on the elft, around the one on the right. If you
his the one of the right with any more than that, the one on the left will have a small fraction of a second of time
more to react than he should. So just quickly take out the one on the right, then go full out on the one on the
left. Shortly after that, go back to the first to make sure he knows he's dead. Final results below.

Don't feel constricted by the diagrams when hoping to use this sequence
in a war. It can be sasily adapted to most any playground. Almost every one I've ever seen has a toower with a sp[iral
slide. The rest is simmple. Also, if there ARE those dreaded slits in the sides of the spiral slide, have your
Blue P, Blue #1, and Blue #2 start firing in the movement from diagram three to diagram four, and then continue in four to
five, and so on. This will help keep your enemies occupied, as well as the possibility of causing themn to forget him
entirely, so on and so forth. Good luck!
|